CI/CD Guide
Isurus includes a built-in CI/CD system that automatically runs pipelines when you push to a repository. Define your build, test, and deploy steps in a YAML file, and Isurus handles the rest.
CI is VCS-neutral: a push to any hosted repository — Git, Mercurial, or Fossil — triggers a pipeline, and tag/release events fire the same way across all three. The examples below use Mercurial (hg) commands, but the equivalent git push or fossil push triggers CI identically.
Overview
The CI/CD system works as follows:
- You commit a
.isurus-ci.ymlfile to your repository root. - When you push, Isurus detects the pipeline configuration and creates a new pipeline.
- A CI agent picks up the pipeline and executes each step.
- Results are streamed in real time to the web UI.
Setting Up CI
1. Create the Pipeline File
Add a file named .isurus-ci.yml to the root of your repository:
steps:
  - name: test
    docker:
      image: golang:1.26
    commands:
      - go test -v ./...
2. Commit and Push
hg add .isurus-ci.yml
hg commit -m "Add CI pipeline configuration"
hg push
3. View Results
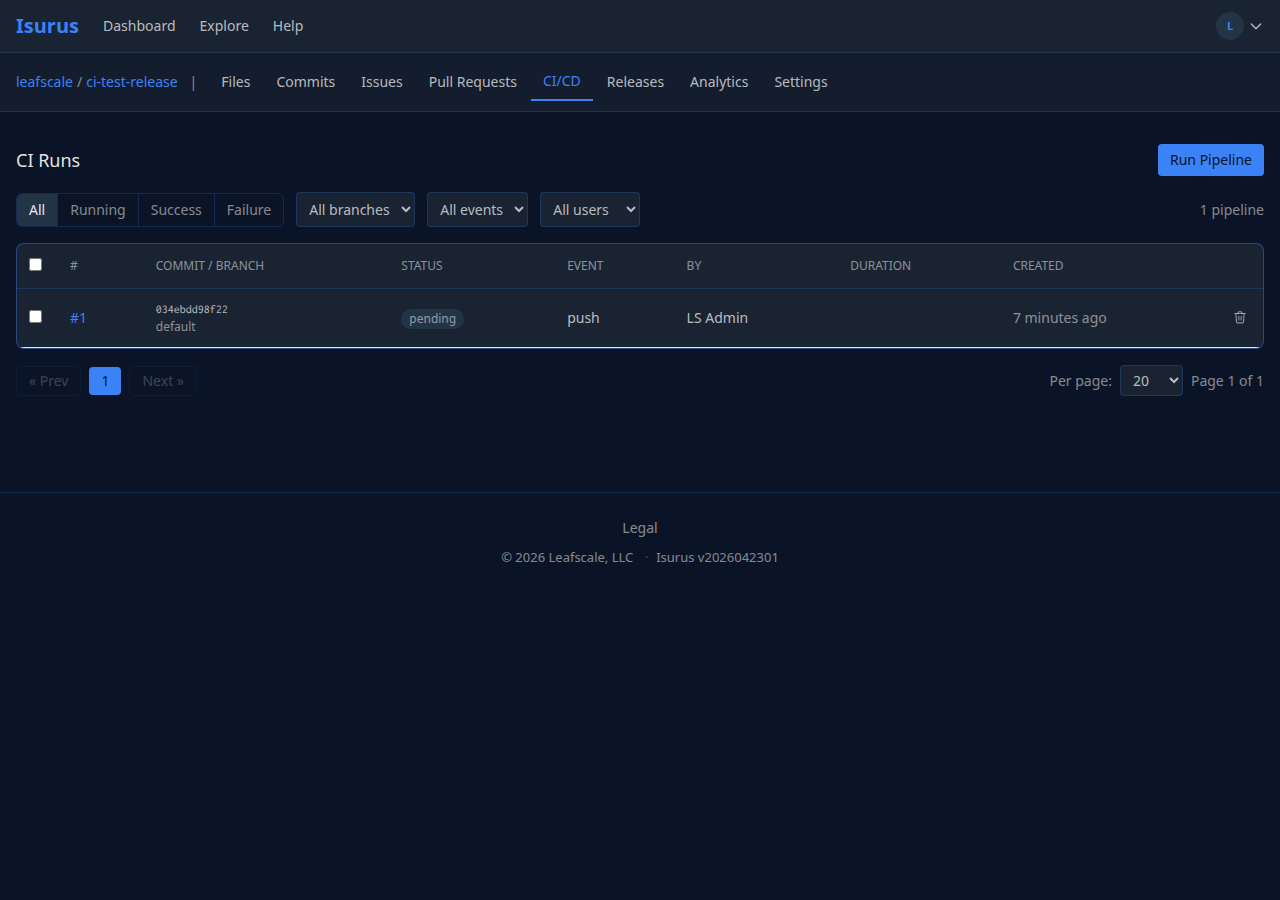
Navigate to your repository and click the CI/CD tab in the repository navigation bar to see the pipeline status, step logs, and results.
Enabling and Disabling CI
CI/CD is enabled by default for all repositories. To disable CI for a repository:
- Navigate to your repository.
- Go to Settings in the repository navigation bar.
- On the General page, uncheck Enable CI/CD pipelines.
- Click Save.
When CI is disabled, pushes will not trigger pipelines. Existing pipeline history is preserved. Re-enable at any time to resume CI on future pushes.
Skipping CI for a Commit
Include [ci skip] or [skip ci] anywhere in a commit's description to prevent that push from creating a pipeline (matching is case-insensitive). This is useful for automated version-bump or auto-tag commits that would otherwise re-trigger CI — important in Mercurial, where applying a tag is itself a commit that would normally fire a tag pipeline.
hg commit -m "Bump version to 2026010101 [ci skip]"
Pipeline YAML Reference
The pipeline configuration file is .isurus-ci.yml, placed at the repository root.
Top-Level Structure
when:
  event: [push]
  branch: [default, stable]

timeout: 45m

resources:
  memory: 2048MiB
  cpu: 1

runs-on: linux/amd64

steps:
  - name: step-name
    ...

services:
  - name: service-name
    ...

release:
  tag: "$CI_TAG"
  ...

notify:
  webhooks:
    - url: "https://..."
      events: [failure]
timeout — Job Time Limit
The optional top-level timeout sets the maximum wall-clock time for the whole job (all steps combined), e.g. "45m" or "1h30m". Default 30m; clamped between 1m and 2h. Raise it for pipelines with long test suites (sanitizers, releases). This is separate from the per-step timeout (see Timeout and Retry), which bounds an individual step instead of the whole job.
resources — Memory and CPU
Optional. Applies to the whole pipeline, not to a single step. A resources: or runs-on: key nested under a step is rejected.
resources:
  memory: 2048MiB   # or 2GiB, or a byte count such as 2147483648
  cpu: 1            # cores; fractions allowed (0.5)
memory is NNNMiB, NNNGiB, or a positive integer number of bytes. Units are 1024-based. MB and GB are rejected. The value must be from 1 MiB (1048576 bytes) through 64 GiB (68719476736 bytes). A value outside that range is a configuration error: the pipeline is recorded as error and is not queued.
When memory is omitted, the pipeline asks for 2048 MiB (2147483648 bytes). When it is omitted and the pipeline defines one or more services, the pipeline asks for 4096 MiB (4294967296 bytes), so the step keeps a 2048 MiB share after the service split. A memory value you set is stored as written.
cpu is optional, from 0 to 64 cores, and may be fractional. 1 is one core; 0.5 is half a core. Omitted means no CPU request. The number is recorded only — it does not change which runner claims the pipeline, and it does not pin the job to that many cores.
runs-on — Operating System
Optional. An operating system, or os/arch:
runs-on: linux/amd64
The OS must be one of linux, freebsd, illumos, or macos. Examples: linux, freebsd/amd64, macos/arm64. Other names (windows, solaris, darwin) and a bare architecture (amd64) are rejected.
If runs-on is omitted, the pipeline stores no OS constraint. That does not change which agent can claim the job: any agent whose executors match the steps can still take it.
when — Pipeline Filters
The top-level when block controls when the entire pipeline runs. If omitted, the pipeline runs on every push.
| Field | Type | Description |
|---|---|---|
event |
string or list | Event types to match (any-of). See the event table below. |
branch |
string or list | Branch names to match (a Mercurial bookmark, a Git branch, or a Fossil branch) |
tag |
string or list | Tag names to match — only meaningful for tag events |
A pipeline is classified with one or more events:
| Event | When it fires |
|---|---|
push |
Any push that updates a branch/bookmark tip. |
tag |
A tag was pushed. Mercurial: a push whose tip commit adds or modifies .hgtags (in hg a tag is a commit). Git: a push that creates a tag ref (refs/tags/*). Fossil: a push that adds a tag. |
pull_request |
A push to a feature branch/bookmark that has an open PR, or when a PR is opened/reopened. A PR push carries both push and pull_request. |
manual |
A pipeline started from the Run Pipeline button. |
A tag event also fires on the webhooks bus when a tag is created (Git tag push, Fossil tag, or a Mercurial .hgtags commit) and can be subscribed to independently of push — see Webhook Payloads for the delivered body. [ci skip] / [skip ci] on the tagged commit still suppresses the tag pipeline the same as it does for a push (see Skipping CI for a Commit).
event matching is any-of: the filter passes if any of the pipeline's events is allowed.
All three fields accept a single string or a list of strings, and every value supports * wildcards (glob):
# Single value
when:
  branch: default

# Multiple values
when:
  branch: [default, stable]
  event: [push]

# Wildcards — match all release tags, on the default line only
when:
  event: [tag]
  branch: [default]
  tag: ["v*"]
Wildcard notes: * matches any run of characters (e.g. release/*, v*, *-rc). No other glob metacharacters are special.
If more than one of event, branch, and tag is specified, all of them must match for the pipeline to run. Some details:
branchis the pushed branch name: the Mercurial bookmark, the Git branch, or the Fossil branch. A push to the repository's default line is matched by its real branch name —default(hg),main/master(git), ortrunk(fossil) — so filter on the name your repository actually uses. (An anonymous Mercurial push with no bookmark falls back todefault.) For a tag event,branchis always the repository's default branch (default/main/trunk) — tags are not branch-scoped in Git or Fossil, so tag pipelines are labeled with the default line regardless of where the tagged commit lives. Filter tag pipelines with thetag:field, notbranch:.tagis empty for non-tag events, so atag:filter never matches apushorpull_requestevent.
steps — Pipeline Steps
Each step defines a unit of work in the pipeline. Steps execute sequentially in the order listed.
| Field | Required | Type | Description |
|---|---|---|---|
name |
Yes | string | Unique name for the step |
docker |
Depends | object | Docker executor config. Contains image: (required for Docker executor) |
image |
Depends | string | Shorthand for docker: { image: ... } — supported for backward compatibility |
commands |
Yes | list | Shell commands to execute |
environment |
No | map | Key-value environment variables |
secrets |
No | list | Secret names to inject as environment variables |
when |
No | object | Per-step branch/event filter (same format as top-level when) |
timeout |
No | string | Maximum duration for this step (e.g., 5m, 30s, 1h). Step is killed if exceeded |
retry |
No | int | Number of retries on failure (0-5). Step is re-run up to this many times before marking as failed |
image-build |
No | bool | Lets this step run a container image builder (BuildKit, Buildah). Requires the machine administrator to allow it — see Building container images |
Backward compatibility:
image:is supported as a shorthand fordocker: { image: ... }for backward compatibility.
Step Example
steps:
  - name: test
    docker:
      image: golang:1.26
    commands:
      - go vet ./...
      - go test -v ./...
    environment:
      CGO_ENABLED: "0"

  - name: build
    docker:
      image: golang:1.26
    commands:
      - go build -o app ./cmd/server
    secrets:
      - deploy_token
Timeout and Retry
steps:
  - name: test
    docker:
      image: golang:1.26
    commands:
      - go test -v ./...
    timeout: 10m
    retry: 2
In this example, the test step will be killed if it runs longer than 10 minutes. If it fails, it will be retried up to 2 times before the pipeline is marked as failed.
Per-Step when Filter
Individual steps can have their own when filter. A step is skipped if its filter does not match the current event and branch:
steps:
  - name: test
    docker:
      image: golang:1.26
    commands:
      - go test ./...

  - name: deploy
    docker:
      image: alpine
    commands:
      - ./deploy.sh
    when:
      branch: default
      event: push
In this example, the deploy step only runs on pushes to the default branch.
image-build — Building Container Images
Building a container image inside CI needs more privilege than an ordinary step,
so it is off by default and has to be asked for explicitly:
  - name: build
    image: moby/buildkit:rootless
    image-build: true
    commands:
      - buildctl-daemonless.sh build --frontend dockerfile.v0 ...
Without image-build: true a nested builder fails with an error that does not
obviously point here — rootless BuildKit reports:
[rootlesskit:child ] error: failed to share mount point: /: permission denied
It is gated twice. The step must ask for it and the machine's
administrator must turn on Nested Image Builds (Admin → Machines → the
machine). A step that asks on a machine that does not permit it runs
unprivileged and fails with the error above — it is not silently granted. A
repository cannot grant itself this.
Administrators: turn it on for dedicated build machines, not for shared
runners. Once enabled, any repository whose pipelines run on that machine
can ask for the relaxed profile.
What it actually grants: the step's container gets
--security-opt apparmor=unconfined, and nothing else. It does not get
--privileged, a Docker socket, added capabilities, or host devices. That is
the minimum a rootless builder needs to set up its own mount namespace.
Because the grant is per-step, other steps in the same pipeline — and every
other repository's pipelines on that machine — are unaffected.
Example: BuildKit
  - name: build
    image: moby/buildkit:rootless
    image-build: true
    secrets: [REGISTRY_CREDS]
    when:
      event: [push]
      branch: [default]
    commands:
      - |
        set -e
        # The registry credentials mount is read-only and this image runs as a
        # non-root user, so point DOCKER_CONFIG somewhere writable.
        export DOCKER_CONFIG=/tmp/dockercfg
        mkdir -p "$DOCKER_CONFIG"
        echo "{\"auths\":{\"registry.example.com\":$REGISTRY_CREDS}}" > "$DOCKER_CONFIG/config.json"

        # Rootless buildkitd cannot build an OCI process sandbox without
        # privileges this step deliberately does not have.
        export BUILDKITD_FLAGS=--oci-worker-no-process-sandbox

        buildctl-daemonless.sh build \
          --frontend dockerfile.v0 \
          --local context=. \
          --local dockerfile=. \
          --output "type=image,name=registry.example.com/app:latest,push=true"
To push several tags in one build, quote the comma-separated name list inside
the output spec, or the second tag is parsed as a separate output key:
--output "type=image,\"name=registry.example.com/app:latest,registry.example.com/app:1.2.3\",push=true"
Migrating from kaniko: kaniko was archived by Google in June 2025. It ran
as root inside its container and needed no special step attribute, which is
why an existing pipeline has noimage-build:line — replacing the step image
alone is not enough, and the migrated step will fail with the mount-point
error above untilimage-build: trueis added and an administrator has
allowed image builds on the machine.
services — Background Containers
Services are background containers that start before the steps and remain running for the duration of the pipeline. Use them for databases, caches, or other dependencies.
| Field | Required | Type | Description |
|---|---|---|---|
name |
Yes | string | Service name (used as hostname for networking) |
image |
Yes | string | Docker image to run |
environment |
No | map | Key-value environment variables |
Services Example
services:
  - name: db
    image: postgres:16
    environment:
      POSTGRES_USER: test
      POSTGRES_PASSWORD: test
      POSTGRES_DB: testdb

  - name: redis
    image: redis:7

steps:
  - name: test
    docker:
      image: golang:1.26
    commands:
      - go test -v ./...
    environment:
      DATABASE_URL: "postgres://test:test@db:5432/testdb?sslmode=disable"
      REDIS_URL: "redis://redis:6379"
Note: Services always use Docker and take
image:directly. Thedocker:block syntax applies to pipeline steps only. A pipeline that defines services and does not setresources.memoryasks for 4096 MiB instead of 2048 MiB.
Full Example
A complete .isurus-ci.yml with filters, steps, services, secrets, release publishing, and notifications:
when:
  event: [push, tag]
  branch: [default, stable]

services:
  - name: db
    image: postgres:16
    environment:
      POSTGRES_PASSWORD: test

steps:
  - name: lint
    docker:
      image: golangci/golangci-lint:latest
    commands:
      - golangci-lint run ./...
    timeout: 5m

  - name: test
    docker:
      image: golang:1.26
    commands:
      - go test -v -race ./...
    environment:
      CGO_ENABLED: "1"
      DATABASE_URL: "postgres://postgres:test@db:5432/postgres?sslmode=disable"
    timeout: 15m
    retry: 1

  - name: build
    docker:
      image: golang:1.26
    commands:
      - go build -o app ./cmd/server

  - name: deploy
    docker:
      image: alpine
    commands:
      - apk add --no-cache openssh-client
      - ./scripts/deploy.sh
    secrets:
      - deploy_key
      - deploy_host
    when:
      branch: default

release:
  tag: "$CI_TAG"
  title: "Release $CI_TAG"
  body: "Automated release from CI pipeline #$CI_PIPELINE_NUMBER"
  assets:
    - dist/*
  secret: RELEASE_TOKEN
  when:
    event: [tag]

notify:
  webhooks:
    - url: "$SLACK_WEBHOOK"
      events: [failure]
      secret: SLACK_WEBHOOK
Pipeline Detail Page
The pipeline detail page uses a split-panel layout for inspecting builds.
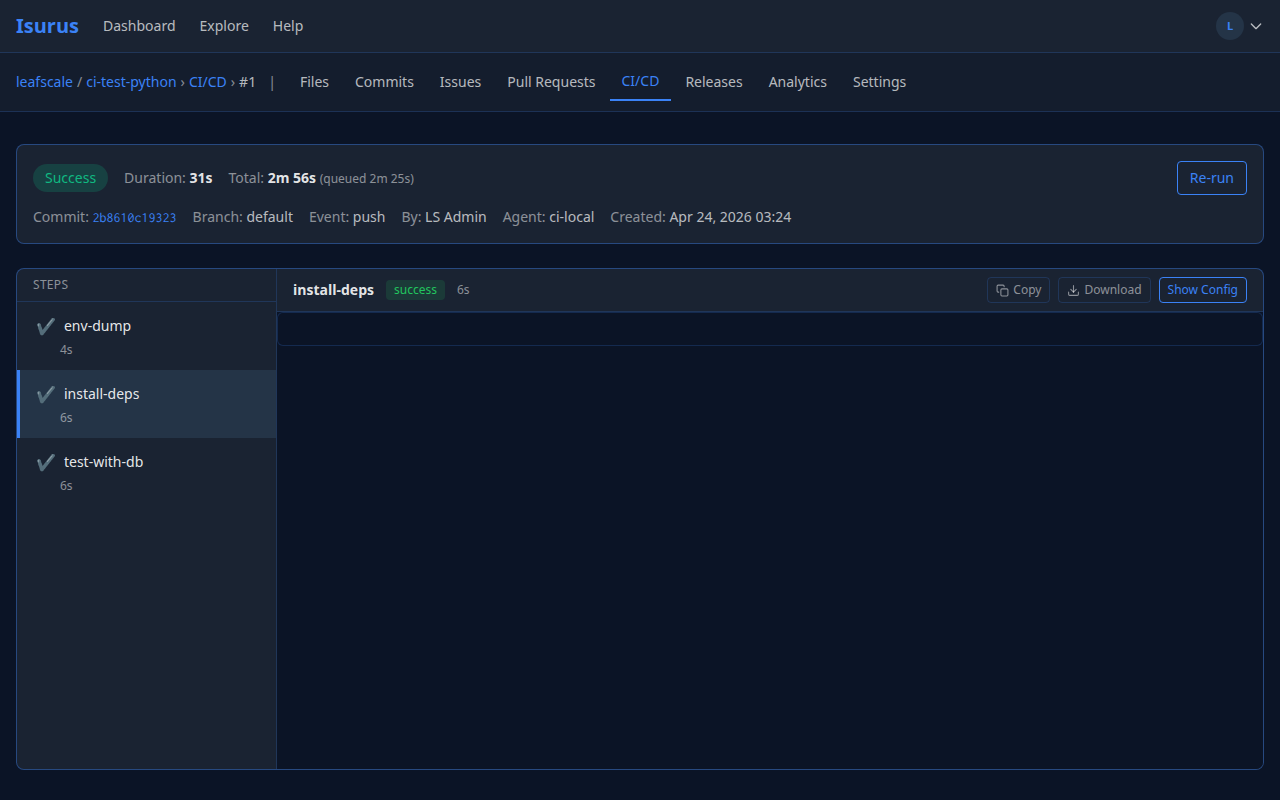
- Left sidebar — Lists each step with its status icon and duration. Click a step to view its log.
- Right panel — Displays the log output for the selected step, along with its status badge and duration.
Status Icons
| Icon | Meaning |
|---|---|
| Green checkmark | Success |
| Red X | Failure |
| Yellow spinner | Running (pulsing indicator) |
| Gray circle | Pending |
| Slash | Cancelled |
| Dash | Skipped |
Real-Time Updates
The detail page automatically updates as the pipeline runs:
- Step status changes — The page polls the API every 3 seconds and reloads when any step transitions (e.g., pending to running, running to success). Step icons, durations, and exit codes update automatically.
- Log streaming — Running steps stream log output via Server-Sent Events (SSE). Lines appear as they are produced by the agent, with updates flushed every 500 milliseconds.
- Breadcrumb navigation — The detail page shows a breadcrumb trail (e.g.,
leafscale / ci-test-python > CI/CD > #13) for easy navigation back to the pipeline list.
Log Viewer Features
- Real-time streaming — Running steps stream logs via Server-Sent Events (SSE). Lines appear as they are produced.
- Copy to clipboard — Copy the full log output with the Copy button.
- Download — Download the log as a file (
pipeline-N-stepname.log) with the Download button. - Show Config — View the commands configured for the step.
Pipeline Metadata
The metadata bar at the top of the detail page shows:
- Pipeline status badge (Success, Failure, Running, etc.)
- Execution duration, total time, and queue time
- Commit hash and branch name
- Event type, who triggered the pipeline, and the CI agent name
- Creation timestamp
- Re-run button to re-trigger from the same commit
Organization CI Dashboard
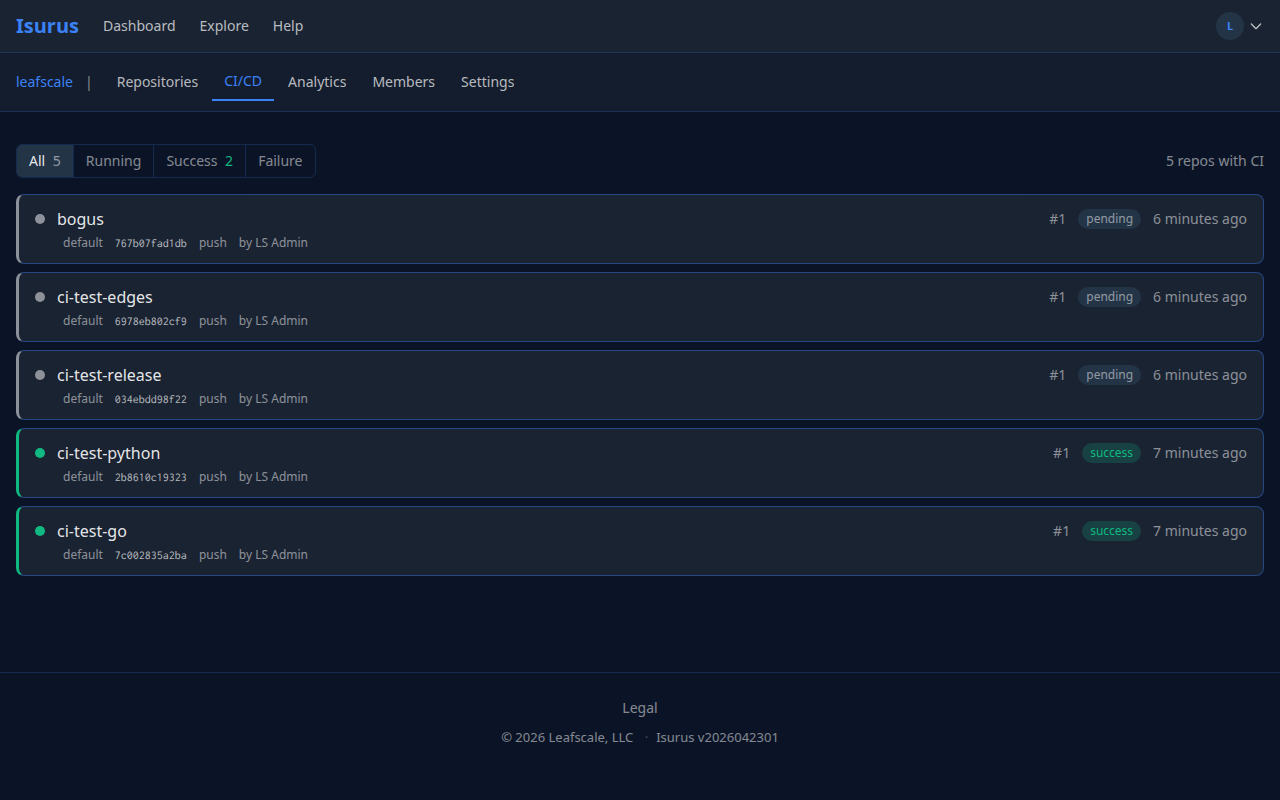
The organization CI dashboard provides a real-time overview of CI activity across all repositories in an organization. Navigate to any organization and click the CI/CD tab in the organization navigation bar to access it.
Dashboard Features
- Status cards — Each CI-enabled repository shows a card with its latest pipeline status, commit, branch, event type, and who triggered it.
- Color-coded indicators — Cards have colored left borders and status dots: green for success, red for failure, amber/animated for running, gray for pending.
- Running pipelines first — Active pipelines are always sorted to the top of the list.
- Auto-refresh — The dashboard polls for updates every 5 seconds. Running pipelines automatically transition to their final status without manual page refresh.
- Status filters — Filter by All, Running, Success, or Failure using the filter pills at the top of the page.
- Click-through — Click any card to go directly to the pipeline detail page.
Pipeline List Page
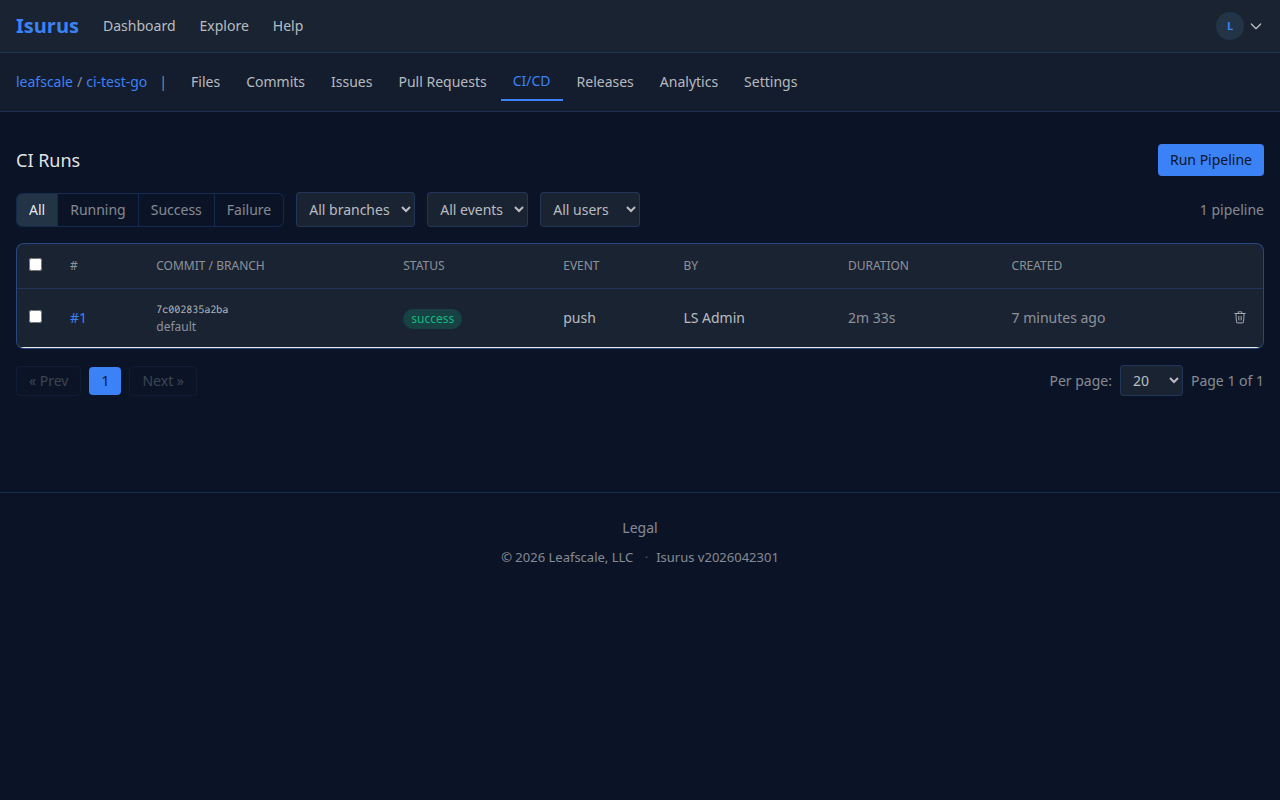
The pipeline list is accessed by clicking the CI/CD tab in the repository navigation bar. It shows all CI runs for the repository under a "CI Runs" heading.
Pipeline Configuration View
When a repository has a .isurus-ci.yml but no CI runs yet (or all runs have been deleted), the page displays a visual summary of the pipeline configuration instead of an empty list.
This shows:
- Numbered steps with their executor type (Docker or Shell)
- Container images for each step
- Timeout and retry settings where configured
- Service containers (database sidecars, etc.)
- Release and notification configuration
This gives you a clear picture of what will run before triggering the first build.
Run Pipeline Manually
Click the Run Pipeline button at the top-right of the CI list page to manually trigger a pipeline from the repository's latest commit. This is useful when:
- You want to run CI without pushing a new commit
- You've deleted all previous runs and want to re-test
- You need to test after changing CI secrets or agent configuration
Filtering
| Filter | Options |
|---|---|
| Status | All, Running, Success, Failure, Pending, Cancelled, Error, Dismissed |
| Branch | Any branch that has had pipelines (dropdown) |
| Event | All events, or filter by specific event type (dropdown) |
| Triggered by | All users, or filter by specific user (dropdown) |
All (the default list) hides Dismissed runs. Use the Dismissed status pill to see them again.
Sorting
The pipeline list table can be sorted by clicking column headers:
| Sort field | Options |
|---|---|
| Pipeline number | Ascending or descending |
| Duration | Ascending or descending |
| Creation date | Ascending or descending |
Pagination
| Control | Options |
|---|---|
| Page size | 20, 50, or 100 per page (dropdown at bottom-right) |
| Navigation | Previous / Next page links with current page indicator |
Managing Pipelines
Re-run a Pipeline
On the pipeline detail page, click Re-run to create a new pipeline from the same commit. This is useful when a failure was caused by a transient issue (e.g., a network timeout).
Cancel a Running Pipeline
On the pipeline detail page, click Cancel to stop a running or pending pipeline. All pending and running steps are marked as cancelled.
Pipeline Parse Errors
If your .isurus-ci.yml has a syntax error, Isurus creates a pipeline with an error status instead of silently failing. Click through to the pipeline detail to see the exact parse error in the step log. Common causes:
- Invalid YAML syntax (indentation, missing colons)
- Missing required fields (step name, commands)
- Empty executor image (
docker:block withoutimage:)
Tip: Use single quotes around commands that contain $ variables to prevent YAML from interpreting them:
commands:
  - 'echo "Commit: $CI_COMMIT"'
Dismiss vs Delete Failed Pipelines
Organization owners and admins can clear failed or errored runs from the default list in two ways:
- Dismiss — Soft-hides failed and errored pipelines (status becomes Dismissed). History and step logs are kept. Dismissed runs are hidden from the default list and available under the Dismissed filter.
- Dismiss all failed — Primary action on the pipeline list banner when failed/errored runs exist.
- Dismiss — On a failed or errored pipeline detail page.
- Delete — Permanently removes pipelines and their logs. Cannot be undone.
- Delete all failed — In the … (More actions) overflow next to Dismiss all failed on the list page.
- Single delete — On the pipeline detail page, Delete removes one pipeline and its logs.
- Bulk delete — Select pipelines with the list checkboxes and click Delete Selected.
CI Secrets
Secrets store sensitive values (API keys, deploy tokens, passwords) that are injected into pipeline steps as environment variables. All secrets are encrypted at rest using AES-256-GCM.
Repo-Level Secrets
Repo-level secrets are managed through the repository settings sidebar under the CI/CD section.
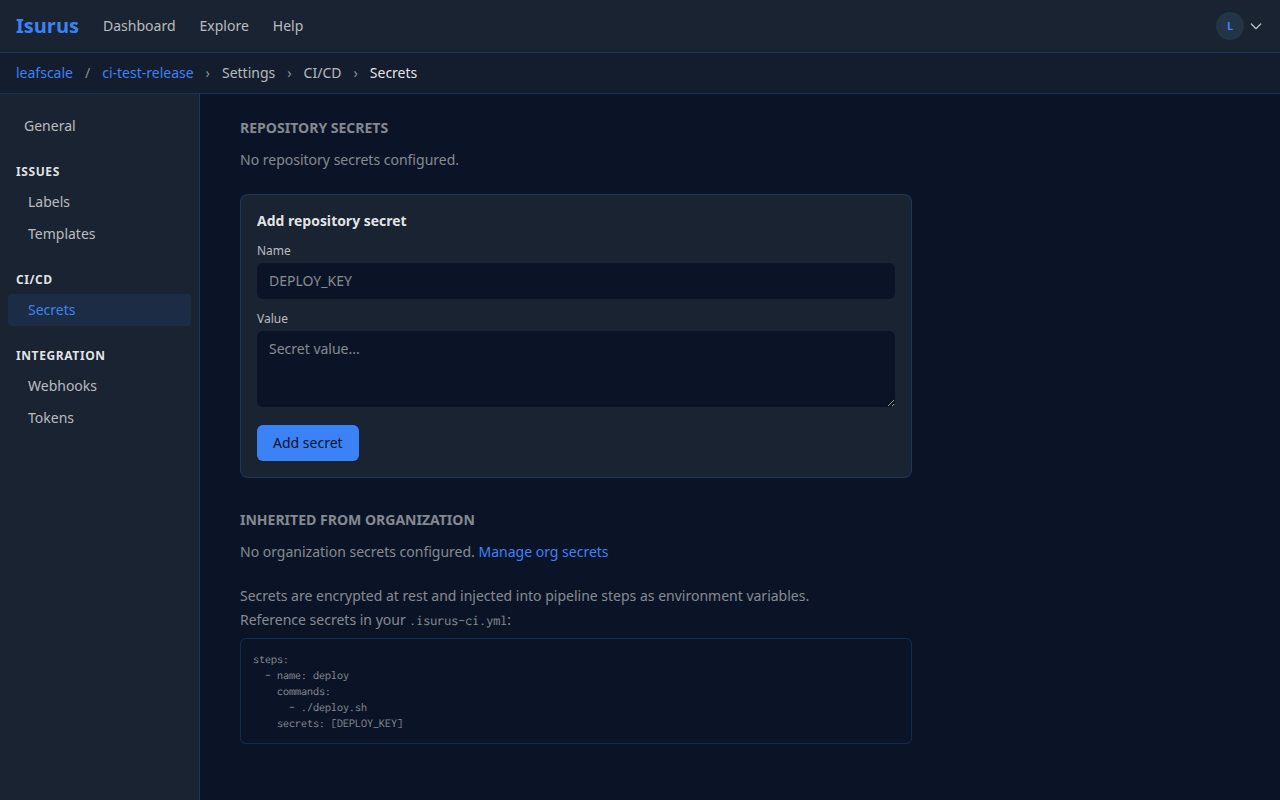
- Navigate to your repository.
- Click Settings in the repository navigation bar.
- In the left sidebar, under the CI/CD heading, click Secrets.
- Enter a Name (used as the environment variable name) and Value.
- Click Add secret.
The page also shows any Inherited from Organization secrets below the repo-level list. Click Manage org secrets to navigate to the organization-level secrets page.
Tip: When creating an API token at Settings > Integration > Tokens, check Save token as CI secret to create both the token and the secret in one step.
Org-Level Secrets
Organization-level secrets are inherited by all repositories in the organization. They are managed through the organization settings sidebar under the CI/CD section.
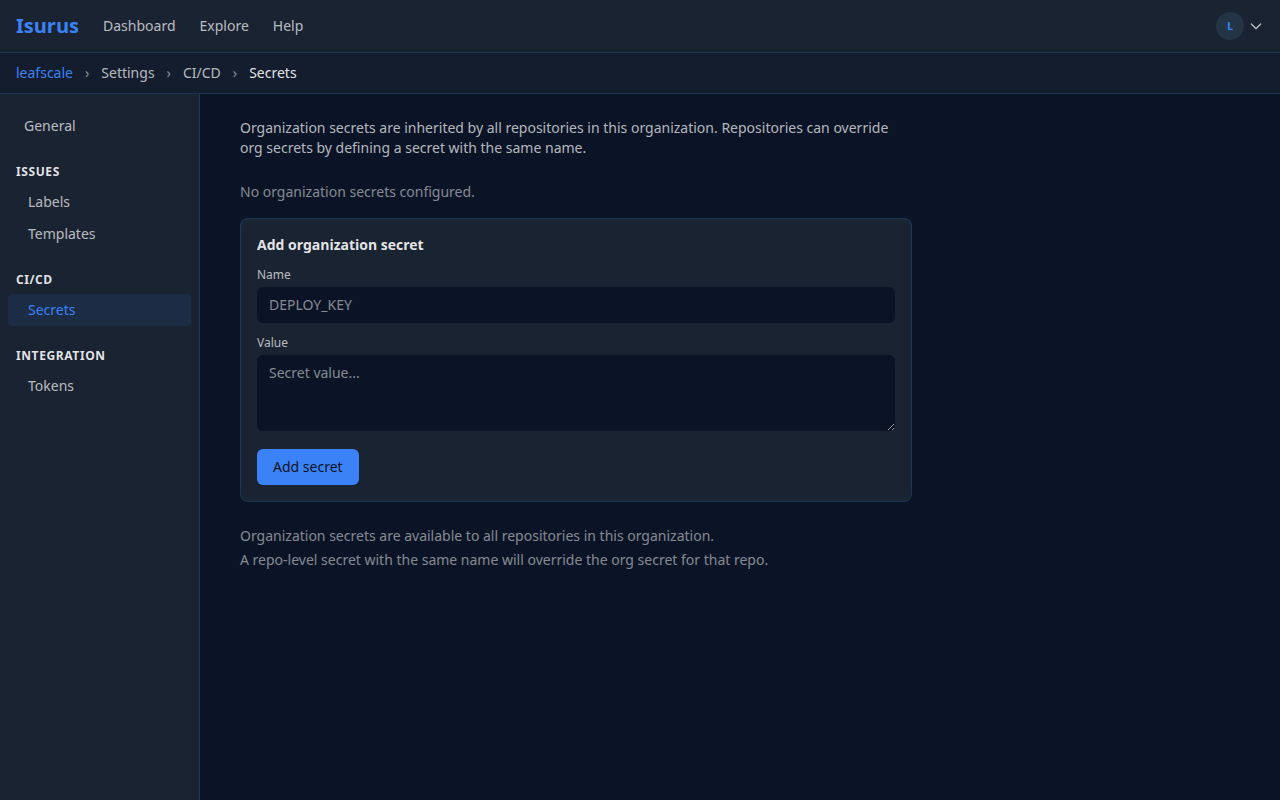
- Navigate to your organization.
- Click Settings in the organization navigation bar.
- In the left sidebar, under the CI/CD heading, click Secrets.
- Enter a Name and Value.
- Click Add secret.
If a repo-level secret has the same name as an org-level secret, the repo-level secret takes precedence (override).
Settings Sidebar Navigation
Both repo and org settings pages use a sidebar layout with sections:
Repository Settings sidebar:
- General
- Issues — Labels, Templates
- CI/CD — Secrets
- Integration — Webhooks, Tokens
Organization Settings sidebar:
- General
- Issues — Labels, Templates
- CI/CD — Secrets
- Integration — Tokens, Service accounts
Using Secrets in Pipelines
Reference secrets by name in the secrets field of a step. They are injected as environment variables:
steps:
  - name: deploy
    docker:
      image: alpine
    commands:
      - echo "Deploying to $DEPLOY_HOST"
      - ./deploy.sh
    secrets:
      - DEPLOY_HOST
      - DEPLOY_KEY
Security
- Secrets are encrypted at rest with AES-256-GCM.
- Secret values are masked in pipeline logs — any output matching a secret value is replaced with
***. - Secret values are never displayed in the web UI after creation. Only the secret name is shown.
- Only organization owners can create or delete secrets.
CI Badges
Embed a build status badge in your README or documentation to show the current CI status.
Badge URL
https://your-isurus-instance/:org/:repo/ci/badge
Embedding in Markdown

Badge Statuses
| Status | Color |
|---|---|
| Success | Green |
| Failure / Error | Red |
| Running / Pending | Yellow |
| Cancelled | Gray |
| Unknown (no pipelines) | Gray |
The badge always reflects the latest pipeline for the repository.
Publishing Releases from CI
CI pipelines can automatically create releases and upload artifacts using the built-in release: block. This replaces manual API scripting with a simple declarative configuration.
Release Block
Add a top-level release: section to your .isurus-ci.yml. It runs automatically after all steps succeed:
steps:
  - name: build
    docker:
      image: golang:1.26
    commands:
      - make build-release

release:
  tag: "$CI_TAG"
  title: "Release $CI_TAG"
  body: "Automated release from CI pipeline #$CI_PIPELINE_NUMBER"
  assets:
    - dist/*                                   # bare glob — uploaded without a description
    - path: dist/app-linux-amd64.tar.gz        # object form — carries a description
      description: "Linux x86_64 binary"
    - path: dist/checksums.txt
      description: "SHA-256 sums for every asset"
  secret: RELEASE_TOKEN
  when:
    event: [tag]
Release Block Reference
| Field | Required | Type | Description |
|---|---|---|---|
tag |
Yes | string | Tag name for the release. Supports CI variable expansion (e.g., $CI_TAG) |
title |
No | string | Release title. Defaults to the tag name if omitted |
body |
No | string | Release description / notes. Supports CI variable expansion |
assets |
No | list | Files to upload as release assets (relative to repo root). Each entry is either a bare glob/path string or a { path, description } object — see Asset descriptions below |
secret |
Yes | string | Name of a CI secret containing an API token with releases:write scope |
when |
No | object | Conditional filter (same format as step-level when). Typically event: [tag] |
All string fields support CI environment variable expansion ($CI_TAG, $CI_PIPELINE_NUMBER, $CI_COMMIT, etc.).
Asset descriptions
Each entry in assets may be written two ways, and you can mix both in one list:
- Bare string — a path or glob, uploaded with no description (the historical form; fully supported):
assets: - dist/*.tar.gz - Object —
{ path, description }, where the optionaldescriptionis a short per-file label shown on the repository's Releases pages (both the release list and detail views, next to each asset's size, download count, and checksums):assets: - path: dist/app-linux-amd64.tar.gz description: "Linux x86_64 binary"
Notes:
pathaccepts the same glob patterns as the bare-string form. When a glob with adescriptionmatches multiple files, that description is applied to every matched file.- Descriptions are a display-only convenience — they do not affect the file name, contents, or the auto-computed SHA-256 / SHA-512 / MD5 checksums (those are always stored and shown regardless).
- Descriptions are capped at 500 characters; longer values are truncated.
- No configuration or opt-in is required — omit
descriptionand assets behave exactly as before.
How It Works
- Tag your release in Mercurial:
hg tag v1.0.0 && hg push - The push triggers a CI pipeline (the
when: event: [tag]filter matches tag events) - Build steps compile your release artifacts
- After all steps succeed, the
release:block runs automatically:- Creates a release via the Isurus API using the configured secret token
- Uploads all files matching the
assetsglob patterns
- The release appears on the Releases tab with all uploaded files
- A "release" step appears in the pipeline detail with logs showing each action
If the release action fails (bad token, API error, missing files), the pipeline is marked as failed.
API Token
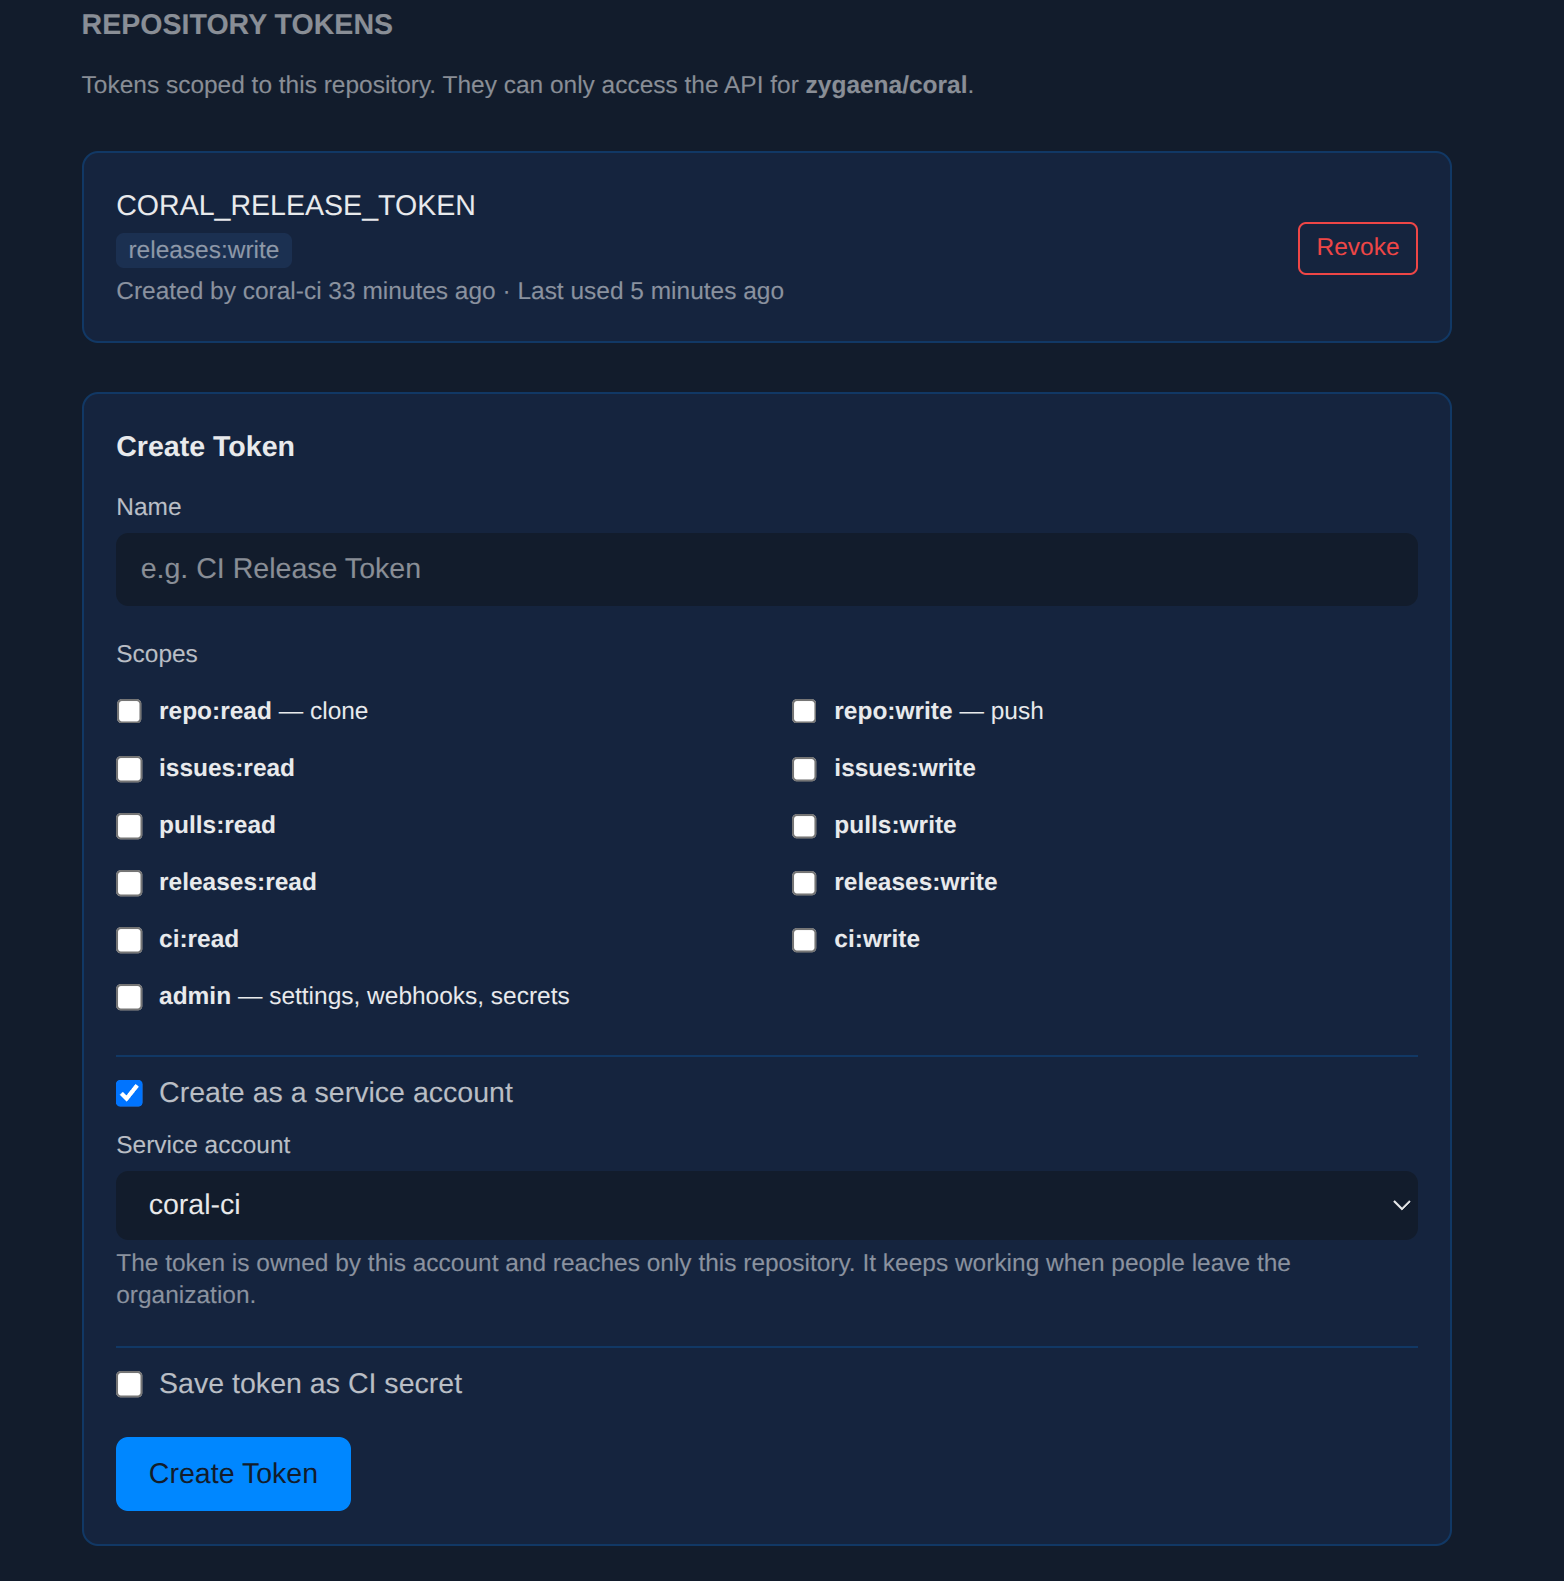
Release tokens should be owned by a service account, not by a person. A
service account belongs to the organization, cannot sign in, and its tokens
keep working when people leave or are disabled — a token owned by a person
stops working the moment that account is disabled, and the failure looks like
an expired token.
- Go to Organization Settings > Integration > Service accounts and create
one, for examplecoral-ci. - Go to your repository Settings, and under Integration click
Tokens. - Tick Create as a service account and choose the account.
- Tick the
releases:writescope. - Tick Save token as CI secret and name it
RELEASE_TOKEN— this creates
both the token and the secret in one step.
The token is bound to this repository and reaches nothing else. To mint a token
that covers every repository in the organization, use the account's own Tokens
page under Organization Settings > Integration > Service accounts; note
that an organization-wide token can create repositories, merge pull requests
and rerun any pipeline in the org, so bind CI tokens to a single repository
unless you need more.
See the Service Accounts guide for the full picture —
creating accounts, choosing a binding, and moving an existing pipeline off a
person-owned token without an outage.
Notifications
The notify: block sends webhook notifications when a pipeline completes. Notifications are sent after all steps (and the release action, if configured) have finished.
Webhook Notifications
notify:
  webhooks:
    - url: "https://hooks.slack.com/services/T00/B00/xxxx"
      events: [failure]
    - url: "https://example.com/ci-webhook"
      events: [success, failure]
      secret: WEBHOOK_SECRET
Notify Webhook Reference
| Field | Required | Type | Description |
|---|---|---|---|
url |
Yes | string | Webhook URL to POST to. Supports CI variable expansion |
events |
Yes | list | Pipeline statuses to notify on: success, failure |
secret |
No | string | CI secret name whose value is used for variable expansion in the URL |
The webhook receives a JSON POST with the pipeline status, commit, branch, repo, and a link to the pipeline detail page.
Slack Example
To send Slack notifications on failure, create a Slack incoming webhook URL, save it as a CI secret named SLACK_WEBHOOK, then reference it:
notify:
  webhooks:
    - url: "$SLACK_WEBHOOK"
      events: [failure]
      secret: SLACK_WEBHOOK
Scheduled Releases
Releases can be scheduled for future publication, useful for coordinating launches or timed announcements.
How to Schedule a Release
- Navigate to your repository's Releases tab and create a new release (or edit an existing draft).
- Fill in the release details (tag, title, description, attachments) as usual.
- Set a date and time in the Schedule Publication field.
- Save the release as a draft. It will not be published immediately.
How It Works
- The Isurus background job system checks for releases whose scheduled publication time has arrived and publishes them automatically.
- Scheduled releases display a blue Scheduled badge on both the release list and the release detail page, along with the scheduled date and time.
- You can cancel or reschedule a pending release at any time from the release edit page.
- Once the scheduled time passes and the release is published, it behaves like any other published release.
Executors
CI agents support two execution modes: shell and docker. The agent auto-detects which executors are available on the host machine at startup and only accepts jobs that match an available executor.
Shell Executor
The shell executor runs commands directly on the agent's host machine. No executor block is needed — simply omit docker::
steps:
  - name: test
    commands:
      - go test ./...
The shell executor is useful when:
- You need direct access to host tools and files.
- Docker is not available on the agent.
- You want faster execution without container overhead.
Note: The shell executor is disabled by default for security reasons. An administrator must enable it during agent registration.
Docker Executor
The Docker executor runs each step inside a container with the specified image. Use the docker: block with an image field:
steps:
  - name: test
    docker:
      image: golang:1.26
    commands:
      - go test ./...
The Docker executor provides:
- Consistent, reproducible build environments.
- Isolation between steps.
- Access to any image from a container registry.
Docker must be installed and accessible on the agent host. The agent auto-detects Docker availability at startup.
After each pipeline teardown (and on the periodic stale sweep), the agent prunes nested Docker images that are unused by any container (docker image prune -a -f). Named volumes are never touched. This is on by default; disable with --docker-prune-unused-images=false or ISURUS_DOCKER_PRUNE_UNUSED_IMAGES=false in the agent environment. The agent does not read forge TOML for this switch.
Finished pipeline log directories under ci.log_dir age out via the ci_log_gc job according to Admin → CI/CD → CI Settings (ci.log_retention_days, default 30). See the Administration Guide for System Health prune of host forge tags and the nested ci-runner.
The Incus executor was removed. It ran each step in a system container,
not a virtual machine, so it shared the host kernel exactly as Docker does — it
was never the stronger isolation boundary it appeared to be. It also behaved
differently from Docker in ways nothing surfaced: no pipeline memory envelope,
no CPU ceiling, one job at a time regardless of the machine's parallelism
setting, and no support forimage-build. Usedocker:(orshell) instead.Incus itself is still used by Isurus — repository imports run inside an
ephemeral Incus container — so a machine may still need it installed for the
import role. It is simply no longer a way to run pipeline steps.
CI Agents
CI agents are worker processes that poll the Isurus forge for pipeline jobs, execute them, and report results.
How Agents Work
- An agent registers with the forge and receives an authentication token.
- The agent polls the forge for pending pipelines.
- When a job is available, the agent claims it, clones the repository, and executes each step.
- Step logs are streamed back to the forge in real time.
- The agent reports the final status (success, failure, error) when the pipeline completes.
Agent Registration
Agents are registered through the Admin > CI Agents panel in the web UI. Each agent gets a unique token for authentication.
Agent Self-Update
Agents automatically update themselves when the Isurus server is upgraded. On each heartbeat (every 5 seconds), the server compares the agent's version against the server version. If they differ, the server includes an upgrade URL in the heartbeat response. The agent then:
- Waits until it is idle (not executing a pipeline)
- Downloads the new binary from the server
- Atomically replaces its own executable
- Exits so the service manager can restart it with the new version
This means upgrading the Isurus server container automatically propagates agent updates to all connected agents — no manual intervention required.
Admin-provisioned agents install the binary at /srv/isurus-agent/bin/isurus-agent, owned by the isurus-agent service user. That path sits under the unit's ReadWritePaths, so heartbeat self-update can replace the binary without root. Older machines that still run /usr/local/bin/isurus-agent should use Upgrade Agent once after this change; that migrates ExecStart and ownership so future heartbeats succeed.
Supported Platforms
The isurus-agent binary is cross-compiled for:
| Platform | Architecture |
|---|---|
| Linux | amd64 |
| Linux | arm64 |
| illumos | amd64 |
| FreeBSD | amd64 |
| macOS | arm64 (Apple Silicon) |
CI Environment Variables
The following environment variables are automatically available in every pipeline step:
| Variable | Description |
|---|---|
CI |
Always true |
CI_PIPELINE_ID |
Pipeline database ID |
CI_PIPELINE_NUMBER |
Pipeline sequential number for the repo |
CI_PIPELINE_NUM |
Alias for CI_PIPELINE_NUMBER |
CI_COMMIT |
Full commit hash |
CI_BRANCH |
Branch name |
CI_EVENT |
Most specific event that triggered the pipeline (pull_request > tag > push) |
CI_EVENTS |
Comma-joined full event set (e.g. push,pull_request) |
CI_REPO |
Repository name |
CI_REPO_NAME |
Repository name (alias) |
CI_ORG |
Organization name |
CI_REPO_URL |
Full URL to the repository |
CI_SERVER |
Server base URL |
CI_SERVER_URL |
Server base URL (alias) |
CI_TAG |
Tag name (only set for tag events) |
Private Registry Authentication
To pull images from a private container registry (or push from a CI step), declare credentials with the container-registry: block at the top of .isurus-ci.yml.
Step 1 — Create a CI secret
The secret's value must be a JSON object with username and password keys:
{"username":"robot$ci","password":"<token>"}
Create it at the repo or organization level via Settings → CI/CD → Secrets. Org-level secrets are inherited by all repos in the org, so a single Sharkos credential can serve every repo.
Step 2 — Reference it from .isurus-ci.yml
container-registry:
  - url: registry.sharkos.one
    secret: sharkos_registry_creds
  - url: docker.io
    secret: dockerhub_creds

steps:
  - name: build-and-push
    image: docker:cli
    commands:
      - docker build -t registry.sharkos.one/myapp:$CI_COMMIT .
      - docker push registry.sharkos.one/myapp:$CI_COMMIT
No docker login step is needed. The agent:
- writes a Docker-compatible
config.jsoninto the pipeline's workspace, - exports
DOCKER_CONFIGwhen pulling step and service images on the host, and - bind-mounts the config into every step container at
/root/.docker(read-only).
Notes
urlmust be a bare hostname — no scheme, no path.registry.sharkos.oneis correct;https://registry.sharkos.one/v2/is not.container-registry:is always an array, even for a single registry.- Credentials are masked in pipeline logs.
- If the referenced secret cannot be resolved when an agent polls for the pipeline, the pipeline is marked as
errorin the UI. The agent logs the failure reason; check the agent host's logs (or the server's logs around that pipeline) to see whether the secret was missing or malformed.
Pull Request Events
Isurus CI distinguishes pushes that update an open pull request from ordinary pushes, so pipelines can gate behavior on PR vs. branch context.
How events are classified
| Trigger | Pipeline events |
|---|---|
| Push to a bookmark with no open PR | [push] |
| Push to a bookmark with an open PR | [push, pull_request] |
| Opening a PR (no new push) | [pull_request] (on the bookmark's tip) |
Push that modifies .hgtags |
[tag] (precedence preserved) |
Filtering with when:
The when.event: filter matches if any event in the set matches any value in the filter. Examples:
steps:
  - name: lint
    image: golangci/golangci-lint:latest
    commands: [golangci-lint run]
    # no when: → runs on push, pull_request, and tag

  - name: integration-tests
    image: alpine
    commands: [./run-integration.sh]
    when:
      event: [pull_request]   # only PR-syncs and PR-opens

  - name: deploy
    image: alpine
    commands: [./deploy.sh]
    when:
      event: [push]           # excludes PR-syncs
      branch: [main]
When the same commit triggers two runs
If a contributor pushes and then opens a PR for that push seconds later, both events fire and two pipelines are created for the same tip commit — one classified [push, pull_request] (from the push), one classified [pull_request] (from the PR-open). This is the documented behavior; it's a minor cost for the simpler trigger model.
Known Limitations
Git LFS objects are not fetched for private repos
CI agents clone private repositories automatically using a short-lived, repo-scoped read-grant token — you don't need to configure any credentials for the checkout. This covers the Mercurial wire protocol (the repository history and file content tracked normally).
It does not yet cover Git LFS object downloads. LFS blobs are served by a separate, API-token-authenticated endpoint that the CI read-grant does not satisfy. As a result:
- A pipeline on a public repo that uses LFS works (LFS reads on public repos are open).
- A pipeline on a private repo that stores files in LFS will clone the repository, but the LFS-tracked files arrive as pointer files, not their real content — any step that reads such a file gets the pointer, not the data.
Because the checkout happens in the agent before your steps run, there is no reliable in-pipeline workaround today. If your CI needs LFS content, the practical options are to keep that repository public, avoid depending on LFS-tracked files in the build, or wait for native support.
Native read-grant support for LFS in CI is a tracked follow-up. See also Using LFS with Isurus.